在Web中嵌入机器学习模型 发表于 2020-02-08 | 更新于 2022-05-16
| 字数总计: 3k | 阅读时长: 14分钟 | 阅读量:
本章中,我们将学习如何将机器学习模型嵌入到Web应用中,不仅仅是分类,还包括从实时数据中学习。
序列化通过scikit-laern拟合的模型 正如我们上一章所述,训练机器模型会带来很高的计算成本。当然,我们不希望每次进行预测分析都需要训练模型。模型持久化的一个方法是使用Python内嵌的pickle模块,它使得我们可以在Python对象与字节码之间进行转换(序列化和反序列化),这样我们就可以将分类器当前的状态保存下来。当需要对新的数据进行分类时,可以直接加载已经保存的分类器,而不必再次用训练数据对模型进行训练:
1
2
3
4
5
6
7
8
9
10
11
12
import pickleimport osdest = os.path.join(os.getcwd(), 'movieclassifier' , 'pkl_objects' ) if not os.path.exists(dest): os.makedirs(dest) pickle.dump(stop, open (os.path.join(dest, 'stopwords.pkl' ), 'wb' ), protocol=4 ) pickle.dump(clf, open (os.path.join(dest, 'classifier.pkl' ), 'wb' ), protocol=4 )
由于无需拟合HashingVectorizer,也就不必对其进行持久化操作。相反,我们创建一个新的脚本文件,通过此脚本可以将向量数据导入到当前Python会话中,下面代码以vectorizer.py作为文件名,保存在movieclassifier目录下:
1
2
3
4
5
6
7
8
9
10
11
12
13
14
15
16
17
from sklearn.feature_extraction.text import HashingVectorizerimport reimport osimport picklecur_dir = os.path.dirname(__file__) stop = pickle.load(open (os.path.join(cur_dir, 'pkl_objects' , 'stopwords.pkl' ), 'rb' )) def tokenizer (text ): text = re.sub('<[^>]*>' , '' , text) text = re.sub('[\W]+' , ' ' , text.lower()) tokenized = [w for w in text.split() if w not in stop] return tokenized vect = HashingVectorizer(decode_error='ignore' , n_features=2 **21 , preprocessor=None , tokenizer=tokenizer)
接下来定位到movieclassifer目录,就可以导入vectorizer及对分类器进行持久化处理:
1
2
3
4
5
import pickleimport reimport osfrom vectorizer import vectclf = pickle.load(open (os.path.join('pkl_objects' , 'classifier.pkl' ), 'rb' ))
在成功加载vectorizer以及反序列化分类器后,我们现在使用这些对象对文档样本进行预处理,并且对其进行预测:
1
2
3
4
5
6
7
import numpy as nplabel = {0 : 'negative' , 1 : 'postive' } example = ['I love this movie' ] X = vect.transform(example) print ('Prediction: %s\nProbability: %.3f%%' % (label[clf.predict(X)[0 ]], np.max (clf.predict_proba(X))*100 ))>> Prediction: postive >> Probability: 81.483 %
使用SQLite数据库存储数据 本节中,我们将创建一个简单的SQLite数据库以收集Web应用的用户对于预测结果的反馈。SQLite是一个进程内的库,实现了自给自足的、无服务器的、零配置的、事务性的 SQL 数据库引擎。它是一个零配置的数据库,这意味着与其他数据库一样,我们不需要在系统中配置。就像其他数据库,SQLite 引擎不是一个独立的进程,可以按应用程序需求进行静态或动态连接。SQLite 可以直接访问其存储文件。
通过如下代码,我们将在movieclassifier所在目录创建一个新的SQLite数据库,并且向其中插入两条电影评论的示例数据:
1
2
3
4
5
6
7
8
9
10
11
12
13
14
15
16
import sqlite3import osconn = sqlite3.connect('reviews.sqlite' ) c = conn.cursor() c.execute("CREATE TABLE review_db" \ "(review TEXT, sentiment INTEGER, date TEXT)" ) example1 = 'I love this movie' c.execute("INSERT INTO review_db" \ "(review, sentiment, date) VALUES" \ "(?, ?, DATETIME('now'))" , (example1, 1 )) example2 = 'I dislike this movie' c.execute("INSERT INTO review_db" \ "(review, sentiment, date) VALUES" \ "(?, ?, DATETIME('now'))" , (example2, 0 )) conn.commit() conn.close()
使用Flask开发Web应用 上一节中完成了用于电影评论分类的代码,现在来讨论使用Flask框架开发Web应用的基础知识。
第一个Flask Web应用 首先,按照如下目录结构创建Web应用的框架:
1
2
3
4
1st_flask_app_1/ -app.py -templates/ -first_app.html
app.py文件中包含了运行Flask Web应用程序而需要在Python解释器中执行的入口代码。templates目录下面是Flask用到的静态HTML文件。首先,看一下app.py的内容:
1
2
3
4
5
6
7
8
9
10
from flask import Flask, render_templateapp = Flask(__name__) @app.route('/' def index (): return render_template('first_app.html' ) if __name__ == '__main__' : app.run()
其中需要注意的是路由注解(@app.route(‘/‘))指定触发index函数的URL路径。接下里通过终端窗口执行下列命令启动Web应用:
1
2
python3 app.py >> Running on http://127.0.0.1:5000/
接下来打开对应的网站,如果一切正常,将会看到如下内容网页:
“Hi, this is my first Flask Web app!”。
表单验证 本节中,我们使用HTML表单升级Flask Web应用,以及学习如何使用WTForms库收集数据。
新的应用程序所需的目标结构看起来如下:
1
2
3
4
5
6
7
8
1st_flask_app_1/ -app.py -static -style.css -templates/ -_formhelpers.html -first_app.html -hello.html
以下为修改后的app.py文件内容:
1
2
3
4
5
6
7
8
9
10
11
12
13
14
15
16
17
18
19
20
21
22
23
from flask import Flask, render_template, requestfrom wtforms import Form, TextAreaFiled, validatorsapp = Flask(__name__) class HelloForm (Form ): sayhello = TextAreaFiled('' , [validators.DateRequired()]) @app.route('/' def index (): form = HelloForm(request.form) return render_template('first_app.html' , form=form) @app.route('/hello' , method=['POST' ] def hello (): form = HelloForm(request.form) if request.method == 'POST' and form.validate(): name = request.form['sayhello' ] return render_template('hello.html' , name=name) return render_template('first_app.html' , form=form) if __name__ == '__main__' : app.run(debug=True )
现在通过Jinjia2模板引擎,在_formhelper.html文件中实现一个通用宏,后续它会被导入到first_app.html文件中用来渲染文本:
1
2
3
4
5
6
7
8
9
10
11
12
{% macro render_field(field) %} <dt>{{ field.label }} <dd>{{ field(**kwargs)|safe }} {% if field.errors %} <ul class=errors> {% for error in field.errors %} <li>{{ error }}</li> {% endfor %} </ul> {% endif %} </dd> {% endmacro %}
接下来,我们创建一个style.css文件,用于控制样式:
1
2
3
body { font-size : 2em ; }
下面是修改后的first_app.html文件内容:
1
2
3
4
5
6
7
8
9
10
11
12
13
14
15
16
17
<!doctype html > <html > <head > <title > First app</title > <link rel ="stylesheet" href ="{{ url_for('static', filename='style.css') }}" > </head > <body > {% from "_formhelpers.html" import render_field %} <div > What's your name?</div > <form method =post action ="/hello" > <dl > {{ render_field(form.sayhello) }} </dl > <input type =submit value ='Say Hello' name ='submit_btn' > </form > </body > </html >
最后我们创建一个hello.html的文件:
1
2
3
4
5
6
7
8
9
10
<!doctype html > <html > <head > <title > First app</title > <link rel ="stylesheet" href ="{{ url_for('static', filename='style.css') }}" > </head > <body > <div > Hello {{ name }}</div > </body > </html >
接下来通过如下代码来运行我们的Web应用:
将电影分类器嵌入Web应用 下面更进一步,将电影分类器嵌入到Web应用中。
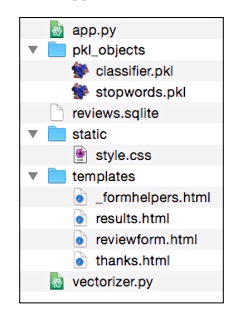
首先,看一下此电影评论分类应用的目录结构,如下图:
在本章前面的小节中,我们已经创建了vectorizer.py文件,reviews.sqlite以及pkl_objects对象。
由于app.py文件较长,我们分两步来分析。首先导入所需的Python模块和对象,并且通过反序列化恢复我们的分类模型:
1
2
3
4
5
6
7
8
9
10
11
12
13
14
15
16
17
18
19
20
21
22
23
24
25
26
27
28
29
30
31
32
33
34
from flask import Flask, render_template, requestfrom wtforms import Form, TextAreaField, validatorsimport pickleimport sqlite3import osimport numpy as npfrom vectorizer import vectapp = Flask(__name__) cur_dir = os.path.dirname(__file__) clf = pickle.load(open (os.path.join(cur_dir, 'pkl_objects/classifier.pkl' ), 'rb' )) db = os.path.join(cur_dir, 'reviews.sqlite' ) def classify (document ): label = {0 : 'negative' , 1 : 'positive' } X = vect.transform([document]) y = clf.predict(X)[0 ] proba = np.max (clf.predict_proba(X)) return label[y], proba def train (document, y ): X = vect.transform([document]) clf.partial_fit(X, [y]) def sqlite_entry (path, document, y ): conn = sqlite3.connect(path) c = conn.cursor() c.execute("INSERT INTO review_db (review, sentiment, date)" \ " VALUES (?, ?, DATETIME('now'))" , (document, y)) conn.commit() conn.close()
app.py的第二部分如下:
1
2
3
4
5
6
7
8
9
10
11
12
13
14
15
16
17
18
19
20
21
22
23
24
25
26
27
28
29
30
31
32
33
34
35
36
37
app = Flask(__name__) class ReviewForm (Form ): moviereview = TextAreaField('' , [validators.DataRequired(), validators.length(min =15 )]) @app.route('/' def index (): form = ReviewForm(request.form) return render_template('reviewform.html' , form=form) @app.route('/results' , methods=['POST' ] def results (): form = ReviewForm(request.form) if request.method == 'POST' and form.validate(): review = request.form['moviereview' ] y, proba = classify(review) return render_template('results.html' , content=review, prediction=y, probability=round (proba*100 , 2 )) return render_template('reviewform.html' , form=form) @app.route('/thanks' , methods=['POST' ] def feedback (): feedback = request.form['feedback_button' ] review = request.form['review' ] prediction = request.form['prediction' ] inv_label = {'negative' : 0 , 'positive' : 1 } y = inv_label[prediction] if feedback == 'Incorrect' : y = int (not (y)) train(review, y) sqlite_entry(db, review, y) return render_template('thanks.html' ) if __name__ == '__main__' : app.run(debug=True )
接下来,看一下reviewform.html模板:
1
2
3
4
5
6
7
8
9
10
11
12
13
14
15
16
17
18
<!doctype html > <html > <head > <title > Movie Classification</title > </head > <body > <h2 > Please enter your movie review:</h2 > {% from "_formhelpers.html" import render_field %} <form method =post action ="/results" > <dl > {{ render_field(form.moviereview, cols='30', rows='10') }} </dl > <div > <input type =submit value ='Submit review' name ='submit_btn' > </div > </form > </body > </html >
下一个模板是result.html,看上去很有趣:
1
2
3
4
5
6
7
8
9
10
11
12
13
14
15
16
17
18
19
20
21
22
23
24
25
26
27
<!doctype html > <html > <head > <title > Movie Classification</title > <link rel ="stylesheet" href ="{{ url_for('static', filename='style.css') }}" > </head > <body > <h3 > Your movie review:</h3 > <div > {{ content }}</div > <h3 > Prediction:</h3 > <div > This movie review is <strong > {{ prediction }}</strong > (probability: {{ probability }}%).</div > <div id ='button' > <form action ="/thanks" method ="post" > <input type =submit value ='Correct' name ='feedback_button' > <input type =submit value ='Incorrect' name ='feedback_button' > <input type =hidden value ='{{ prediction }}' name ='prediction' > <input type =hidden value ='{{ content }}' name ='review' > </form > </div > <div id ='button' > <form action ="/" > <input type =submit value ='Submit another review' > </form > </div > </body > </html >
此外,style.css文件如下:
1
2
3
4
5
6
body { width :600px ; } #button { padding-top : 20px ; }
同样,thanks.html的内容如下:
1
2
3
4
5
6
7
8
9
10
11
12
13
14
<!doctype html > <html > <head > <title > Movie Classification</title > </head > <body > <h3 > Thank you for your feedback!</h3 > <div id ='button' > <form action ="/" > <input type =submit value ='Submit another review' > </form > </div > </body > </html >
同样,最后我们启动Web应用:
接下来,我们就可以访问网站了。
在公共服务器上部署Web应用 测试完Web应用后,我们可以将其托管到PythonAnywhere服务器上。托管到PythonAnywhere网站后,我们可以通过访问<username>.pythonanywhere.com。
当收到用户的反馈后,模型会自动即时更新,但是如果服务器崩溃或者重启,clfd对象的更新就会重置。使得更新能够持久化保存的一个方法就是:模型一旦被更新就立即序列化新的clf对象。但是随着用户的增多,此方案的效率会逐渐底下。另外一种解决方案就是使用SQLite数据库保存的反馈信息更新预测模型。为了更新clf对象,我们创建一个update.py脚本文件:
1
2
3
4
5
6
7
8
9
10
11
12
13
14
15
16
17
18
19
20
21
22
23
24
25
26
27
28
29
30
31
32
33
34
35
36
37
38
39
40
import pickleimport sqlite3import numpy as npimport osfrom vectorizer import vectdef update_model (db_path, model, batch_size=10000 ): conn = sqlite3.connect(db_path) c = conn.cursor() c.execute('SELECT * from review_db' ) results = c.fetchmany(batch_size) while results: data = np.array(results) X = data[:, 0 ] y = data[:, 1 ].astype(int ) classes = np.array([0 , 1 ]) X_train = vect.transform(X) clf.partial_fit(X_train, y, classes=classes) results = c.fetchmany(batch_size) conn.close() return None cur_dir = os.path.dirname(__file__) clf = pickle.load(open (os.path.join(cur_dir, 'pkl_objects' , 'classifier.pkl' ), 'rb' )) db = os.path.join(cur_dir, 'reviews.sqlite' ) update_model(db_path=db, model=clf, batch_size=10000 )
创建好update.py的脚本中,我们需要在app.py开头增加一行导入update.py脚本中update_model函数的代码:
1 2 from update import update_model
然后在应用程序的主脚本中调用update_model函数:
1
2
3
4
... if __name__ == '__main__' : update_model(filepath=db, model=clf, batch_size=10000 ) ...